The last year of medical school is stressful enough having to revise for finals and organise your foundation jobs. Having to sort out an amazing elective abroad can seem like too much to handle and it can be quite difficult knowing where to start. I’ve just finished organising an elective to South Africa and so this post aims to demystify the process!
1) Choose your goals
The first thing you need to do is decide why you’re doing an elective as this will determine the timeframe from which you need to start organising. There’s a spectrum of how involved how you can get in your elective and some people will want a proper medical experience whilst some will want a thinly veiled excuse for extended travel; both are valid.
If you’re looking for a “serious” elective then you’re going to have to start planning early. For popular options like trauma in South Africa, US placements, and a lot of Australia placements this can mean up to 18 months in advance. If a placement is popular enough to warrant applying this early in advance there will most likely be a webpage dedicated to their electives with thorough instructions and dates to apply so read these thoroughly. Additionally, take into account any language barriers. Whilst an exotic country might seem like the best of both worlds, if you can’t interact with the patients you’ll be limited to an observational role which hinders your experience.
If you’re looking to spend the majority of your elective travelling then there will be less urgency with timings as you can choose a country that suits you and join on to any department that will accept you. Each university will have known elective destinations that are lenient with sign-offs so ask around to find out. The key thing here is making sure you aren’t paying too much in elective fees. Popular electives can charge hefty fees so bear this in mind if you aren’t planning on doing much medicine. For reference: South Africa is charging me £900 for 5 weeks compared with Uganda offering an elective for £350 for the same time period,
2) Shortlist countries
Once you’ve figured out whether you’re going to be doing a chilled or serious elective, you need to narrow down your options for countries. If you’re mostly travelling, you might have a continent in mind or a type of trip you want to take (beaches/safaris/hiking) which can help whittle down the options.
Photo by Porapak Apichodilok
If you’re doing more medicine you might have a certain specialty or niche you want to explore (rural surgery/cutting edge research/trauma) or you might just base it on the languages spoken. Even so, it can be difficult to go from a country all the way down to an individual hospital so here are a few ideas.
Check university archives
Your university most likely has a list of past electives students have gone on which you can search through by country and see which hospitals people went to. The imperial one is here and includes a brief report as well as contact information so is incredibly helpful. However, it is far from an exhaustive list.
Email the big hospitals
The odds are in your favour that the big hospitals will be running elective programmes. A quick google will tell you the biggest hospitals or the centres specialising in X, Y and Z. Check out their website and try and find a contact email to enquire about whether they run electives and who to contact further.
Email the medical schools
The medical schools in a country will be linked to hospitals that run elective schemes and the medical schools themselves can be much easier to get in contact with. Look up the medical school’s websites and find an elective page; they’ll often have a list of hospitals they work with and contact details.
Read elective blogs
The more niche and rural electives can be tricky to find but if you know what country you are looking for then reading a few blogs from people’s electives will send you down a rabbit hole of past electives, often with contact details and specific tips on that elective. It was through this that I found out about a rural elective in Tanzania that offered me a spot in their intensive care unit (the place with high flow oxygen).
3) Start early
It’s been mentioned earlier but popular electives can take over a year to organise so be prepared. However, it can take way longer than you expect to sort your elective out even if it’s not a popular destination.
It can be really anxiety-inducing watching the deadline get closer whilst their elective office continues to ghost your emails and there will always be mistakes made or things that need amending. A lot of admin teams will start your application from scratch if you amend your dates in any way and this can remove any progress you’ve made so far. Additionally, electives fall through .especially with COVID. Giving yourself enough time to organise a backup elective will prevent you from getting stuck with a domestic one you have no interest in.
Do your nerves a favour and give yourself a solid few months to work through everything.
4) Be persistent
This is probably the best tip I can give; you are going to get ignored a lot. When you aren’t being ignored you’ll be waiting weeks for a reply. Be proactive and send follow-up emails to make sure you haven’t been lost in a stream of applications.
*Me sorting an elective
Don’t be rude. Apologise for the follow-up email and explain that you are checking in as you haven’t heard anything regarding your application and you are very keen to work with this institution. If you receive an email saying processing takes X amount of weeks then don’t email until that deadline has passed; you will be ignored.
If a deadline is coming up and communication is slow then don’t be afraid to follow up with a reminder of the dates that documents need to be completed by and, if necessary, splurge on a phone bill to call the office directly.
5) Get set of documents ready
If you’re going to set a wide blanket of elective applications you can save some time by organising some very common documents:
Medical CV- I had never written one before but it doesn’t take long and is mostly detailing your experience from placements. Check out some advice here.
Passport- This might need to be certified and your university can do this
Proof of studies- university can supply
Medical School transcript- university can supply
Vaccination record- occupational health can provide
If you have these prepped it’s likely you’ll just have to fill out a quick application form. Collating all these documents is the time-consuming part.
6) Know your deadlines
Photo by Olya Kobruseva
Don’t miss out on your dream elective because of deadlines. Without being repetitive, start early and find out the deadlines of both your university and the host university for sending applications, finalising paperwork, getting approval, paying the host fees, and applying for funding. Final year is busy and this can take a back seat at times, don’t let the deadlines sneak up on you because that’s when you’re guaranteed to hit delays.
Enjoying the blog?
I hope this takes some of the uncertainty out of organising your international elective. Drop a like and ask any question in the comments or message me on Instagram!
Once we had rented a car (see the last post on car rentals here), we had way more freedom and immediately went to Yellowstone National Park. This was definitely up there as one of my favourite places in America and four days definitely wasn’t enough to see everything.
However, for people with limited time, this post covers some of the main sights in Yellowstone in just four days.
Day 1
We definitely underestimated the time it would take to get into Yellowstone. The drive there was uneventful but there was a huge queue to enter the park so don’t pack too much into the first day. When you do buy entry consider getting the “America the Beautiful” Pass ($80 annual fee for all national parks).
Norris geyser basin
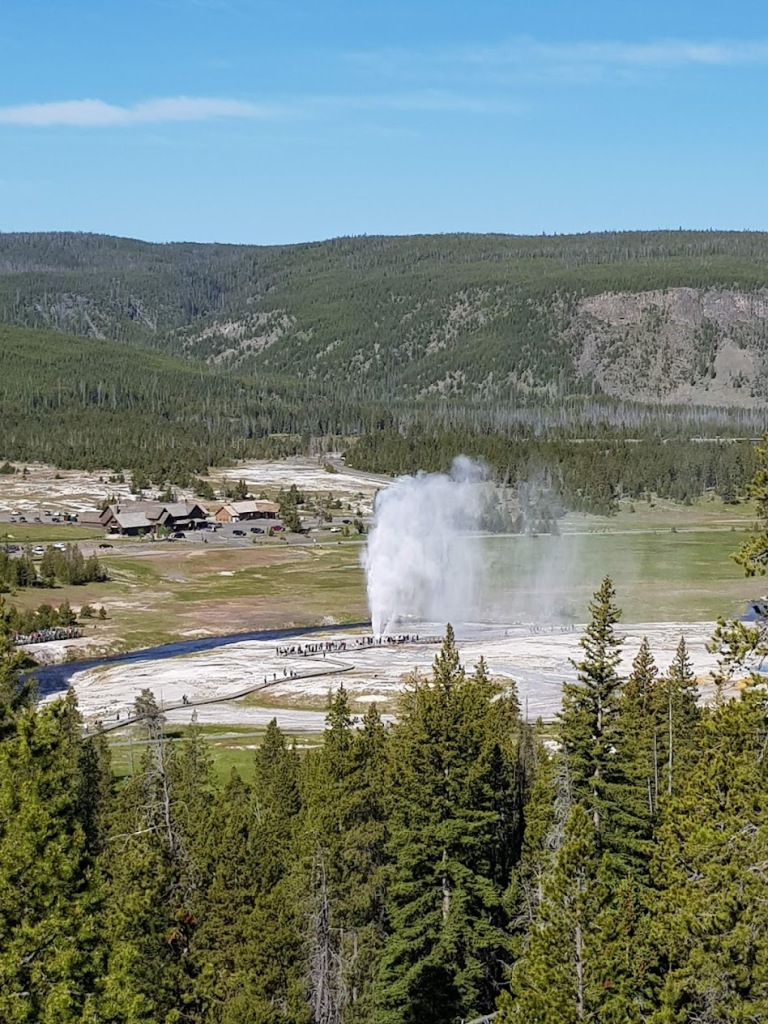
Once we got in we headed to Madison campsite which is reasonably central (in all honesty it was one of the few that had availability when I tried to book). The roads within the park form a figure 8 and I tried to split the park into quadrants starting with the upper left. This meant starting with Norris Geyser Basin which is the hottest and oldest of the basins in Yellowstone. The springs and geysers are impressive and there’s a museum if you fancy brushing up on your geothermal knowledge.
On our exit, we saw our first bison and realised the warnings about the time delays were true as it stood in a crossroads blocking traffic in all directions. Once we got moving we drove north up to Mammoth hot springs. The drive there was stunning and it was an ethereal experience somehow being the only people there, alongside a handful of deer. The springs themselves are equally impressive; from a distance, they look like a huge pile of snow but close up it becomes a cascading limestone waterfall.
Mammoth hot springs
On the way back we stopped by artist paintpots (actually the closest to the campsite but it broke up the drive). This is a pleasant and small walk with a few large springs and some colourful paintpots. If you fancy walking to the viewpoint you can get a birds-eye view of everywhere.
Day 2
Old faithful viewpoint- a bit less crowded
This was a big day, filled with some of Yellowstone’s top sights and covered the lower left quadrant of the park. We started by driving to Old Faithful; the park’s most popular geyser. The infrastructure of the park revolves around here, with a huge visitor centre, museum and hotel (the all you can eat lunch isn’t bad).
The geyser’s name comes from its reliable eruptions, around 20 times a day, with enough accuracy that the times are posted for you to plan your route around. It’s worth a watch and you can also walk up to the viewpoint which leads onto plenty of routes nearby.
We continued on to check out the endless sights in the upper geyser basin before looping back for lunch. Some of my personal favourites were the morning glory pool (ridiculously colourful) and daisy geyser which let out a huge eruption as we passed.
Morning Glory
After lunch we went to on a little hike on the biscuit basin trail which passes west geyser and jewel geyser before continuing onto the mystic falls trail. This had quite the incline but gave stunning views of the park before ending at the falls where you could cool off a little bit.
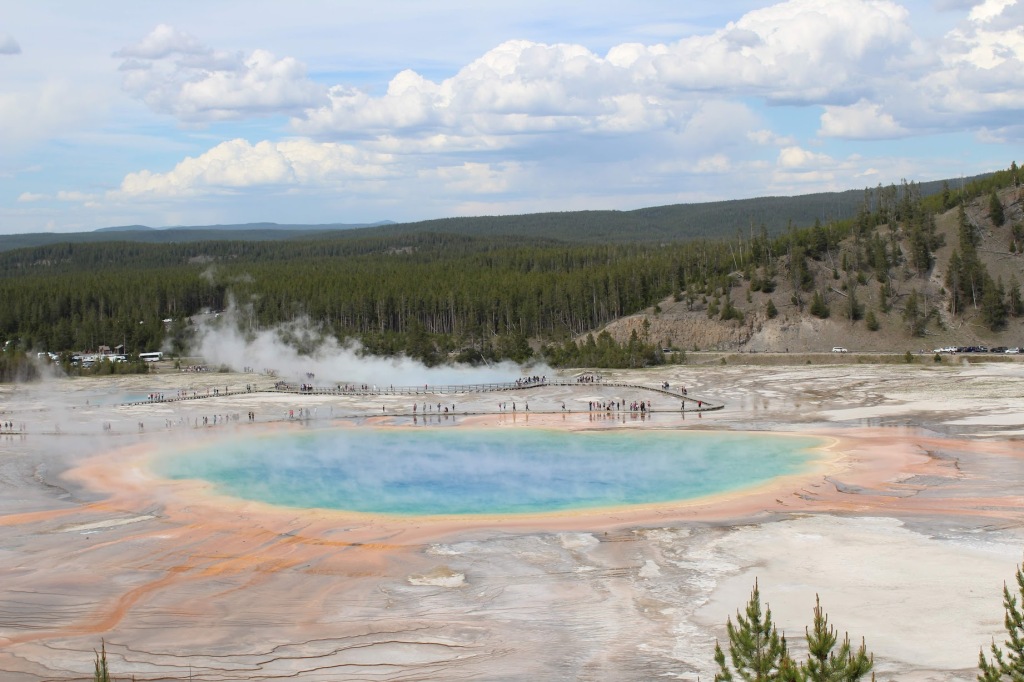
The route back from the waterfall was spiced up a little bit by a snake scare so we got down much quicker than we got up and drove towards Grand Prismatic. This is one of Yellowstone’s most famous springs (it was on the cover of my chemistry textbook at school).
Grand Prismatic spring
It’s absolutely stunning and you can see it close up from the boardwalks but to get a full appreciation of the colours go to the viewpoint in the trees on the opposite side. We then continued from the viewpoint to go to Fairy Falls which was still quite busy but then if you go even further you reach Imperial Geyser and there was no one else with us.
In all honesty, this was already more than enough but we couldn’t finish the day without being utterly exhausted so we briefly stopped by the Fountain Paint Pots. It was on our way back to the campsite and, like the artist paintpots on day 1, consists of mudpots with a myriad of colours, as well as some geysers for good measure.
Day 3
Be warned- this day has a lot of walking in. It was an amazing day with probably the best views of the trip but we may have been underprepared on the water aspect so bring lots! For this day (and day 4) we were staying at Bridge Bay as we had only managed to book two nights at Madison and we were at the mercy of no shows as to where we stayed.
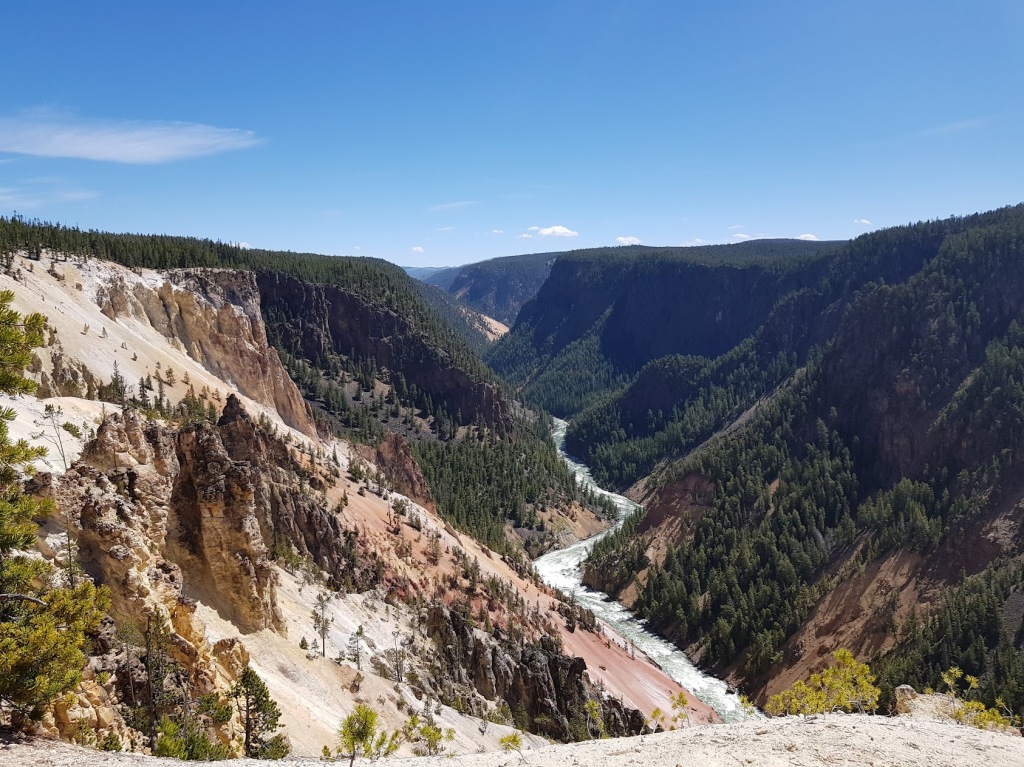
The vast majority of the day centred around Yellowstone canyon and the upper right quadrant. We started off on the north side (not sure if it’s called that but on a map its north of the river) to check out the lower falls and you can walk along to the lookout point before continuing to the grand view and inspiration point. It may have been the time of day but this side was definitely the quieter of the two.
Inspiration point
The next stop was to drive to the south side and check out the upper falls view before completing Uncle Tom’s trail. This is a 0.7-mile trail that leads to a good viewpoint of the waterfalls. This was the busiest part so we decided to continue along the southern rim trail to get better views and reach artists point (you can drive here but we walked).
The view here is stunning and we saw that the hiking trail continued to Ribbon lake so we kept going. The walk isn’t really long but you need to factor in that you will continuously stop to take photos of the canyon as it continues to evolve and the colours shift in the rock.
It was on the way out that we ran out of water with at least an hour of walking back to the car. The combination of dehydration and the comparison with the stunning canyon meant I was pretty disappointed with the lakes; I wouldn’t massively recommend it if you have a tight schedule (continuing past artists point was worth it for the serenity and improved photo ops though).
This took us well into the afternoon and we were keen to spend some time dedicated to watching wildlife so we headed to Lamar valley which is well known for the wildlife around twilight.
Unfortunately, we didn’t factor in that we would need binoculars so, whilst we did see a lot of wildlife, it was understandably at quite a distance. However, as we were starting to tire of squinting at animals in the distance we turned round to see a stag about 50m away posing in the setting sun.
Following that, as we got into the car we heard a commotion and saw people rushing to video a honey bear darting through the woods chased by a wolf. This was all in the space of 10 minutes after 1.5 hours of sitting watching animals miles away so be patient!
Day 4
Our last day was the emptiest because day 3 had well and truly exhausted us. This covered the bottom right quadrant which is mostly occupied by Yellowstone lake so there was less available to do anyway.
Again starting from Bridge Bay campsite, we started off exploring the west thumb geyser basin trail. This geyser basin is much quieter than those near Old Faithful but no less impressive, it’s definitely worth a visit if you want to feel less crowded and have more space for photos. The trail is based to the north of the lake and we walked along the edge of the lake afterwards admiring the tranquillity.
West Thumb geyser basin
There are also some small hikes that are signposted around the lake but as far as I remember they didn’t have a name and the geolocation of my pictures is none the wiser. Regardless we didn’t see anyone else on these hikes and it was a welcome break from the busy sights of the past few days.
It was after these hikes that we went back to Old Faithful centre for the all you can eat buffet lunch (a fair distance from the lake so do be warned). We were getting pretty sick of our boring packed lunches and definitely got our money’s worth devouring bison burgers, elk sausages and plates of brownies.
The afternoon was spent checking out Dragon’s Mouth spring and the mud volcano. The former’s name is due to the roaring steam billowing out from a cave at the base of the hill where the spring sits and is well worth checking out if you’re in the lake area.
Dragon’s Mouth spring
Once you’ve had your fill of exploring around the lake then it’s time for another spot of wildlife watching at Hayden valley, another renowned spot for animal viewing. We spent the early evening here and generally used it as a chance to unwind.
Once again we didn’t have binoculars but made friends with some veterans who had telescopes set up and got to watch a bald eagle in its nest.
Enjoying the blog?
I had a lot of fun reminiscing over this trip and I hope this itinerary helps you plan your next trip to Yellowstone!
Let me know what you did in the comments and make sure to subscribe to the blog for updates including the next post on tips for camping in Yellowstone.
Before I start writing posts about the start of the American road trip, I thought this was a good opportunity to give some pointers on car rental.
This was my first time renting a car and, luckily, it went pretty smoothly. That said, I’ve learnt some things since then that could easily have been avoided with these tips!
1) Shop around for the best deal
Just like with flights, car rental company prices vary wildly depending on who you choose. It can seem like the price is extortionate yet going with online car rental brokers can cut the cost of getting the same car from the same company.
Sites like kayak.co.uk and rentalcars.com are great for comparing across companies and finding the absolute best price. It can also let you tweak the dates (sometimes going over a week will be cheaper than 6 days or going over a month is cheaper than 27 days etc.) and adjusting location which can make a big difference.
For example, when I travelled to Slovenia I found that the flights were dirt cheap to Venice compared to Ljubljana. However, when I checked the cost of car rental, it was about 5x more in Venice and it was £200 cheaper to get a bus into Slovenia and pick the car up there.
Good deals can sometimes be deceiving and it’s always worth checking whats included. Generally the established firms like Alamo and Avis make unlimited miles a standard part of the rental agreement. However, budget choices like EasyCar will sometimes scrap this to keep costs down.
This means that a certain number of miles are included (usually ~100 miles/day) and after this it can cost £0.30/mile which really adds up. Obviously it depends on where you’re driving and what you’re using the car for.
Having a plan of how far you plan to drive in total is useful as the 100 miles a day is an average so if your overall trip will work out below that it can save you money. If you haven’t got a plan and want to see where the trip takes you then you might have peace of mind not being restricted by mileage.
If you’re driving around Cornwall then 100 miles a day isn’t an issue but if you’re doing an American road trip, you can reach 100 miles very quickly (my current record is 310 miles from the Grand Canyon to LA which would have cost an additional £63 with the above numbers).
3) Remember the drop off fee
As convenient as it is to pick your car up at your start point and drop it off on the other side of the country, drop off fees can jack the price of a rental up. A lot of the time the drop off fee isn’t clearly marked so you have to compare the price with a round trip rental.
The further away you go the more it’s going to cost, to such an extent that it may be worth trying to plan your route into a loop or getting a train/bus to your final destination after dropping the car off. If you’re driving in the US then check what counts as a different location; sometimes dropping off elsewhere in the same state will not charge a fee.
4) Hidden charges for under-25s
Insurance companies don’t like young drivers and it’s going to cost you to rent a car under 25. The exact age varies country to country but most charge up until the age of 25. There’s no way to get around it by being an additional driver but smaller cars have fewer restrictions.
The costs can be quite a lot, with additional charges of £35/day in the UK with some providers. It’s definitely worth knowing exactly how much you will have to pay in advance so you can make a good comparison. Some companies will just say “additional fees are paid at the counter” but you’re a bit screwed if you wait until then to find out they’re rinsing you.
In general, always compare the prices for cars that have no hidden fees and clearly state they include: young-driver fee, drop-off fee, additional driver fee, and whatever insurance package you are looking for.
5) Choose the right car
The smaller the car is the cheaper its going to be but you need to choose a car to fit the occasion.
If you’re driving around small European towns then a small Fiat will be perfect. If you’re going off-road in Iceland you need a 4×4. If you’re doing a chunky road trip across America you want something a bit roomier that won’t overheat if it’s driving hundreds of kilometres a day.
Don’t automatically opt for the smallest car because it’s cheaper
Opting for the cheapest car isn’t the most economical choice if it’s going to break down after a long day of driving.
6) Inspect before you go
Whenever you search a car rental company online, all of the poor reviews will be people who have been charged for damage that they swear was already there when they rented it. Don’t give the rental company any excuse to charge you.
Before you sign the paperwork there will be a diagram of the car and the staff will draw on any pre-existing marks. Once you sign, you are agreeing that any marks not drawn on are your fault.
So, before signing anything do your own inspection of the car, point out every small scratch (they’ll usually show you a tool at this point that the scratch has to be bigger than to be counted) and make sure it’s all documented.
Don’t sign until you’re happy everything is accounted for
To be extra safe it’s worth taking photos of the exterior, wheels and windows with time-stamping on, in case you miss something and you can check the photos later. The person organising the rental might think it’s overkill but it beats paying the excess for damage that you didn’t make.
7) Give yourself time when returning
It’s very easy to only factor in 5 minutes to park the car and drop the keys off at the rental company before dashing for your flight home. However, assuming you are dropping the car off in hours (would recommend), it’s worth giving yourself more time.
Having some additional time to drop the car off means you can double check the rental company are happy with the state of the key, clear up any issues, and ensure you’re not in for any nasty surprises on the way back.
It’s much harder to convince the company that the scratch wasn’t there when you left it, or that the car was clean when you dropped it off, over email. The few minutes to confirm this before running away can save a lot of hassle and money in the coming weeks.
8) You get what you pay for
There’s a few things I mean by this.
Firstly, from a pure car perspective: a small cheap car will not have the same performance as a larger car (going back to point 5 on choosing the right car).
Secondly, you might choose the same car size but the price varies massively between companies. This is possibly due to the age of the car. Make sure you haven’t bagged yourself a 20 year old Fiat for your trip across Europe instead of a 1 year old model with minimal miles on the clock.
Thirdly, customer service is reflected in the price. Going with the rental big dogs like Alamo can sometimes cost more for the exact same car. However, this is because of the reliable and speedy customer service nature. Some companies will offer very cheap cars but all the reviews slate the service they received (e.g HolidayAutos).
Always consider what is driving the price down. How old is the car you’re renting?
There will be less hassles when renting the car, a quicker response if issues arrive, and they’re less likely to obsess over the car; trying to find the smallest scratch to charge you with for extra money.
Overall, it can sometimes be worth paying a little bit extra for a reliable car company or a newer car.
9) Don’t plan too much on day one
It’s tempting to plan to grab the car and dash off to begin the road trip. Renting the car can take a while though. If you’re not in a super popular destination then they might not be waiting for you at the airport desk (looking at you Ljubljana) or they might take a while going through all the paperwork.
The only thing that makes renting a car more stressful is knowing that you need to have driven across the country before the end of the day. Give yourself a loose schedule, it also gives you time to drive the car around some quieter areas and get used to it’s feel before hitting the main roads (especially if you’re changing which side of the road you drive on).
10) Get the right insurance
It can be super confusing trying to figure out which insurance you need to get but ultimately it’s down to you.
It’s mandatory to get the collision damage waiver (CDW) but this can still leave you with a hefty excess. It also usually doesn’t cover damage to areas aside from the main body of the car. You can upgrade to super CDW which reduces the excess and often there are add ons to protect different parts of the car as well.
Don’t get pressured into buying extras you don’t need
It comes down to personal preference and what you’re comfortable with excess wise. If you’re driving somewhere that has high accident rates you may want to get a lower excess policy and if you’re driving somewhere off road you might want a gravel policy (especially in Iceland).
The two things to know are:
If you have CDW then no matter how hard the company pushes when you pick the car up, you aren’t obligated to pay for additional insurance
It can sometimes be cheaper to buy additional insurance from a third party instead of through the rental company/ the excess might be lower for a similar price
Enjoying the blog?
Thanks for checking this post out, if you found it helpful then drop a like or even share the post! If you aren’t on the mailing list then join today and let me know you’re own tips in the comments!
After a summer in Iceland and a bank holiday in Mallorca, we’re back on the American Voyage posts! Check out the last post on Memphis here.
We had two full days in Nashville and explored a LOT on foot. It’s a rapidly evolving city and the skyline is full of signs of construction. There’s something for everyone, from delicious food to great nightlife; if you’re travelling the south then a trip through Nashville is a necessity. This post is going to cover 5 things you have to do when you arrive.
1) Country Music Hall of Fame
I was fairly sceptical about this place, having never had much interest in country music. However, just like the soul and rock&roll museums in Memphis, I was amazed.
The museum is huge and covers literally every big name in country music. Naturally there are endless opportunities to listen to different artists but near the end of the museum you’ll find an interactive recording booth which is hilarious.
It’s fairly pricey at around $25 for a ticket but it takes hours to get through and is a completely different vibe to other places in the south. Besides, you’re guaranteed to find a new singer that you like.
2) Explore the Parthenon
The age old decision of whether to travel to Tennessee or Athens just got a little bit easier. The Centennial Park is located west of downtown Tennessee and is a great place to relax and escape the hustle and bustle of the city (e.g the roaring sounds of rainbow monster trucks for Pride). When we were there a free concert was taking place and we ended up spending a few hours there.
The main sight to see is the replica Parthenon. Nashville is apparently nicknamed the Athens of the South due to its involvement in higher education. In order to fully commit to the name, the Parthenon was erected and is fully to scale. However, it’s being put to good use beyond being iconic and homes an art museum.
3) Learn local history at Tennessee State Museum
If the Country Music Hall of Fame is breaking the bank, then the State museum is one of the best deals going. It is completely free to enter and covers the history of Tennessee from how the landscape was formed, through to the first settlers, the civil war and beyond.
It’s amazingly comprehensive and surprisingly engaging given the sheer volume of information that is included. You could spend a whole day in here but as it’s free you don’t need to feel compelled to stay for your money’s worth.
Views of the State Capitol from near the museum
An added bonus is the surrounding area. The museum is on the edge of the Bicentennial capital mall state park with a cool WW2 sculpture and the nearby state capitol gives a nice view of the city.
4) Enjoy the nightlife
The nightlife in Nashville is amazing! It’s generally seen as a city for bachelor/hen parties and throughout the day you’ll see groups of women cycling carts through the streets of Nashville whilst absolutely hammered.
We were luckily here for a Saturday night and headed out to Lower Broadway in the middle of a crazy storm. All of the electricity was down in the suburb we were staying in and the lights of the bars and honky tonks was essentially a homing beacon.
I have no recommendations for which bar to go to as we just aimlessly wandered between them all. The majority are several floors with different styles of music (still a heavy emphasis on country music though) and most of them also have open rooftops to chill out on as well. With regards to price, we didn’t pay any entry fees, but I can’t guarantee that we weren’t lucky.
5) Eat all of the hot chicken
Nashville hot chicken is renowned and it’s something you have to try (or the plant-based alternative). We were there for 3 nights and had 3 lots of hot chicken- one of which I’m not ashamed to say was for breakfast.
Hattie B’s
Having only tried a few of the places, I can’t tell you the best places (check out a better source here) but I don’t think you’ll be disappointed with Hattie B’s. The portions are huge, the spiciness was a good level and the side dishes were cooked just as well as the chicken.
One thing to bear in mind is the queues. Nashville is a touristy city and any of the recommended or well-known hot chicken restaurants will have huge queues, so come a bit earlier than you plan to eat. (it took about 45 minutes to get into Hattie B’s on a Friday.)
I managed to sneak away this bank holiday weekend to Mallorca and devoted one day to exploring the island with a car. I asked a few of the hotel staff where we should aim to see and Sa Calobra popped up as being the best beach in Mallorca; it was immediately on the list.
Having visited the beach it is different to any other beach I’ve been to, and by no means is it a simple journey. This guide is going to cover what makes it the best beach in Mallorca, what you need to know before coming and how to get there.
If you prefer video guides then subscribe to my Youtube channel here– the video is coming soon.
Why is Sa Calobra the best beach in Mallorca?
If your idea of the perfect beach is white sand and palm trees then this isn’t the article for you. Sa Calobra is split into two beaches: Cala Sa Calobra and Torrent de Pareis which is the beach most people go to. Whilst the beach can be busy on the weekends, it’s removed from a lot of the tourist drama that is found on resort beaches.
The bay itself is a dried up river bed so it’s very pebbly and it is worth wearing proper shoes on the walk there. The closer you get to the water the smaller the pebbles are and the softer it is to lie down.
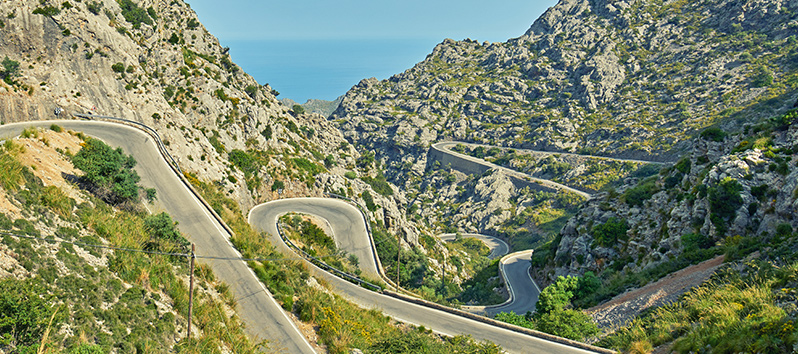
The fun starts before you arrive at the beach. The only road to Sa Calobra winds up and over the Serra de Tramuntana mountains. In the right car, the drive is exhilarating as you negotiate hair pin turns on a steep incline. There are a few points you can stop to admire the view at the top and it’s definitely worth pulling over as you’ll want your eyes on the road whilst driving!
Take care with the blind corners
Once you get to the bay, you’ll notice the setting of the beach is stunning; you’re surrounded by steep cliffs on all sides, save for a small crack in the rock where the sea enters. This protects from wind and also means the water is very calm. The water itself manages to be a deep turquoise whilst also being extremely clear, there are lots of people snorkelling. A set of buoys protect swimmers from the boat and you’ll see thrill-seekers cliff jumping off a set of collapsing stairs that are carved into the rock face.
The bay sits between towering cliffs
If you get bored of swimming then you can explore further up the river bed. It feels like you’re miles from civilisation in the mountains, is very peaceful, and the anatomy of the cliffs in constantly changing with new caves popping up high above you.
Things to know before you go
There’s a few things I wish I’d known before going that would have added to the trip as well as some things I luckily got right for my first visit.
If you’re renting a car I’d opt for a small car. The drive down is scary enough without having to negotiate two wide cars passing each other. We had a Fiat Panda and it meant I only got beeped once for getting to close to a car on a bend. The speed limit for most of the pass down to the beach is 60km/hr, which you’re unlikely to be consistently driving at, so take Google Maps estimations with a pinch of salt.
Once you park your car up (€3 per hour by cash or card) it’s a steep short walk downhill to the port then several hundred metres more to Torrent de Pareis. The moral of the story is bring some trainers as well as flip flops as it can be slippy and if you want to explore the river bed you need proper shoes.
The beach itself is devoid of amenities. The port has toilets and restaurants but it’s a hefty uphill walk to them. For this reason I’d bring drinks with you and some food/snacks. If you need the toilet go before you get to the beach and if you burn easily bring your own umbrella for shade as it’s very exposed in the middle of the day.
How to get to Sa Calobra
There are two options of getting here: driving or ferry. The ferry departs from Port Soller and is the easiest way to get to the island, taking around an hour. If you’re nervous about driving then this is the option for you.
The alternative option is to drive the pass and come from the north or south. If you come from the south you will drive via Soller and make use of a tunnel to reduce mountain driving times. The north will take you via Pollença and involves more winding roads. It took us about 45 minutes extra coming this way but we got a bit lost.
When you see signs for Lluc continue driving towards Soller and Palma and you will shortly see a sign for Sa Calobra. We spent a while incorrectly trying to navigate through Lluc (definitely worth stopping at to check out the history here though).
Once you go through the archway the descent begins and it’s a must to take it slowly and avoid looking at how high up you are if you’re scared of heights!
Look at the twists!
Enjoying the blog?
I hope this was a helpful insight into what is widely considered Mallorca’s best beach. Let me know your thoughts in the comments and drop a like on the post.
Don’t forget to subscribe if you’re new to get fortnightly travel tips!
Iceland is one of the few countries to reliably be on the Green list as well as allowing UK tourists in. I travelled the entire ring road with Nicole over 12 days and it was one of my favourite trips.
This guide details the route we took with some tips in retrospect on what to see and what to avoid. This is a pretty hefty post so if you’d prefer to watch it in video form then check out the vlog here.
Day 1- Explore Reykjavik
This was a bonus day for us as the rules regarding entry to Iceland changed shortly before we arrived. Instead of having to isolate until a negative test result, double-jabbed tourists don’t need to take a PCR as of July.
We got the bus (number 55- use the Straeto app) but it’s not a particularly cheap option; it’s a better idea to rent your car immediately and drive.
Hallgrímskirkja
In the capital you can explore on foot. Follow the rainbow road to check out the cathedral( Hallgrímskirkja) before exploring downtown and grabbing a hotdog for lunch.
Some other outdoor spots to explore are the Sun Voyager and Harpan. If the weather isn’t holding up then pop into one of the museums dotted around the city such as the the Phallological museum.
Day 2- Reykjanesbær to Vik
We picked up our car near Keflavik airport and set off along the south coast. This is one of the most visited parts of Iceland, with good reason. There are stunning waterfalls, hikes and glaciers just minutes from the ring road.
Seljalandsfoss
Our first waterfall was Seljalandsfoss which you can actually walk behind! Head a few 100m down the path and you’ll find a hidden waterfall, Gljufrabui; it feels like you’re in a rainforest. There’s a small fee to park near the waterfalls but I saw a few people parking further down the road so risk it if you dare.
The next stop is Skogafoss, just as impressive as the first falls but with the option to climb up the side via stairs. Once you’re at the top you can hike along the river for as long as you want, there’s some smaller falls to check out too.
Lastly, drive up to Dyrholaey, a peninsula with great views of the sea and some rock formations. It’s a great spot for birdwatching so bring binoculars and you can see huge stretches of black sand beaches. Bear in mind, the last part of the drive is quite steep with hair pin turns. From here it’s a short drive to Vik campsite (cooking facilities and wifi available).
Day 3- Vik to Skaftafell
Fjaðrárgljúfur
The highlight of this day is the glacier hike. Ours departed from Skaftafell national park and we booked on adventures.com for about £50 each.
The first site when you set off is Laufskálavarða but if you’re tight for time then this is skippable. It’s a massive plain with volcanic rocks stacked up which is supposed to bring travellers luck; a nice pit stop if you want to stretch your legs but thats about it.
From here drive onwards to Fjaðrárgljúfur, a picturesque canyon that takes around 30 minutes to explore. It doesn’t take too long to arrive at Skaftafell and you’ll have time to check out the visitor centre and possibly do a short hike to the foot of a nearby glacier.
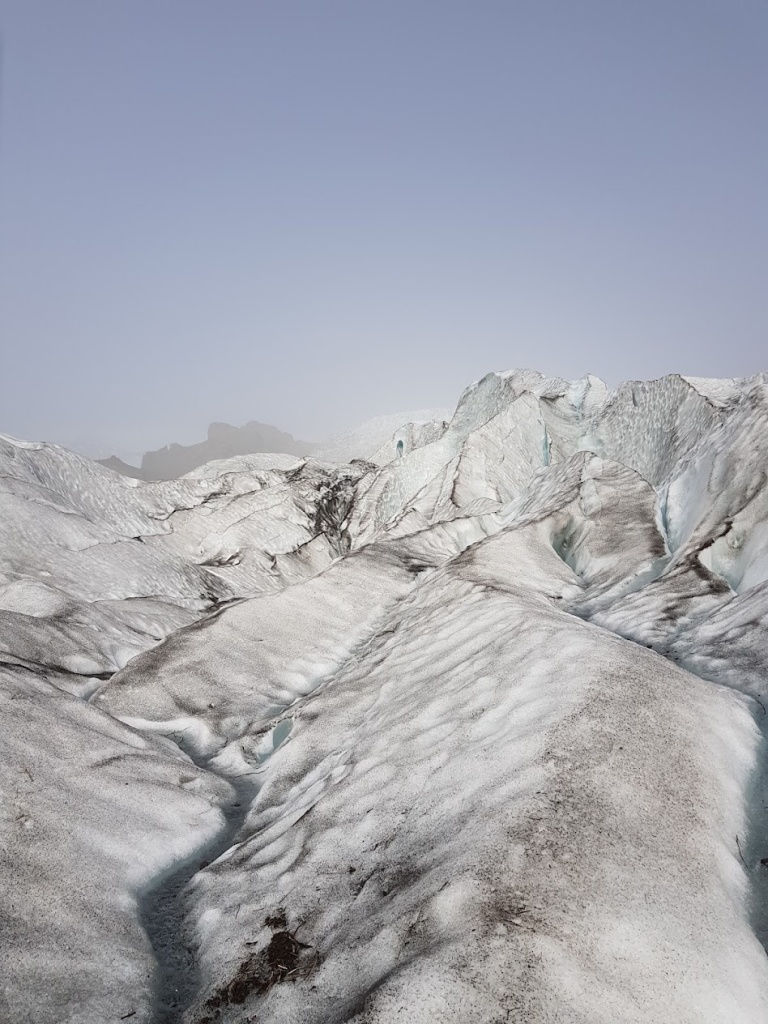
Glacier hiking
The glacier hike is in the afternoon and is a must. You have to have a guide but they add lots to the experience, from teaching you how to use crampons to teaching you about melting glaciers and showing you the best photo spots. Tonight, you’ll stay at Skaftafell campsite (free showers).
Day 4- Skaftafell to Hofn
This is a glacier day from start to finish. We started with a hike in Skaftafell, which goes to Svartifoss and then loops round to a glacier viewpoint called Sjonarnipa. It takes 1.5-2 hours to complete at a leisurely pace with time to admire the views and take photos.
Glacier lagoon
Once you leave Skaftafell the first stop is Glacier Lagoon and you have the chance to get an amphibian boat tour or a kayak tour. We hadn’t planned ahead and kayaks were booked up so we just walked around the edge of the lake and admired the huge icebergs sitting in the stunning blue water.
Diamond beach
After this you can walk across the road to Diamond Beach. The icebergs in Glacier Lagoon eventually get washed into the sea and then drift back onto the beach where they shine like diamonds. They come in a variety of sizes and I could have spent a whole hour taking photos. If you have a decent camera this is a must-see spot.
This is the point where a lot of tours will head back towards the capital but the next glacier is Heinabergsjökull. This hasn’t been integrated into the tourist region yet and so the signs are lacking and the roads are dodgy.
You can drive to the foot of the glacier and walk alongside it and there are paths marked with painted wooden pegs that you can follow but we didn’t venture too far. If you want to drive any further it requires a 4×4 but this was already ~20 minutes from the ring road and it’s not necessarily worth it (unless you want to be completely away from tourists).
If you have a 4×4 then you can also visit Hoffellsjökull but if not, at the nearby Hoffell guesthouse there are some thermal spring hot tubs you can use for 1000ISK which have a variety of temperatures (first was the hottest) and great views. It’s not too far from here to Hofn campsite.
Day 5- Hofn to Seydsifjordur
This is a long day of driving and there are two options depending on if you set off early or not. It’s a short drive to Stokksnes where you can pay 900ISK per person to explore an abandoned Viking film set and do some hikes along a black beach with a good view of the pretty Vestrahorn mountain. It was really windy when we were there so we didn’t walk for long and the film set alone is not worth 900ISK.
Hengifoss
The route from here is up to you. Regardless you will drive through Djúpivogur which is where we stopped for lunch at a reasonably priced grill. There’s also a funky waterside art piece of all the native birds eggs to explore and nearby is a really weird free gallery of bones and rocks (that’s the best explanation I can do).
The eastern fjords are stunning so the long drive doesn’t feel that way. If you have an extra day then take it slow up route 1 and explore the fishing towns en route. Otherwise you can cut across the inland to Lagarfljót where there are hikes galore as well as Hengifoss, the third largest waterfall in Iceland (it’s a fairly hefty incline for about 30 minutes). If you finish before 6 then get some ice cream from the truck near the parking lot.
If you’ve had enough for the day then camp in Egilsstaðir, otherwise continue on towards Seydisfjordur campsite (cooking facilities) and enjoy the stunning views and waterfalls as the town comes into view.
Day 6- Seydisfjordur to Myvatn
View overlooking the town
This was a hectic day because it was the Euros final and I wanted to be sat down watching it by 7pm. In the morning we explore the town including a nearby waterfall and the rainbow steps to the church. We then did a 2.5 hour hike that goes through scenic fields and waterfalls before looping back and giving a panorama of the town. Watch out for the turn off across the river at the power station because it’s easy to keep walking endlessly.
After the hike the next stop is Dettifoss, but this is a long drive. When you reach the turnoff you can go down the first path which will lead you to the left side of the waterfall and is a rough road (apparently the second turnoff is a smoother road).
The waterfall itself is monstrous in power but less scenic than some of the previous falls because it’s a murky brown. If you have more time you can walk down the canyon to see more falls too.
Krafla
After this it’s another chunky drive towards Myvatn. Just before you reach the lake you can stop by Hverir. This is the first taste of Iceland’s volcanic power and you can explore bubbling mudpots amongst a cloud of smelly sulphur.
Across the road is Krafla where you can walk around a dazzlingly blue lake in a crater and hike through a huge lava field with crazy rock formations. We were here for about an hour but it could easily have been two if I didn’t need to get to Myvatn lake campsite to watch England lose to Italy.
Day 7- Myvatn to Vermalid
Dimmuborgir
Lake Myvatn has so much to offer and the majority of the day is spent here. We drove clockwise around the lake starting at Hverfjall which is a huge crater that tales around an hour to circumference. If you’re in a rush today then this is skippable but it’s a nice warm up to the day.
The next stop is Dimmuborgir which is another lava field but with lots of short hikes in and the landscape is surreal. It’s definitely worth exploring and it’s easy to find a quiet section to yourself on one of the longer loops.
All of these stops take less than an hour and are only a few minutes drive from one another. Höfði is a bit less volcanic, with more tree cover, and offers close up views of the lake in tranquil surroundings. The last stop on the lake is Skútustaðagígar which is a series of psuedocraters with more views of the lake and a great ice cream cafe nearby.
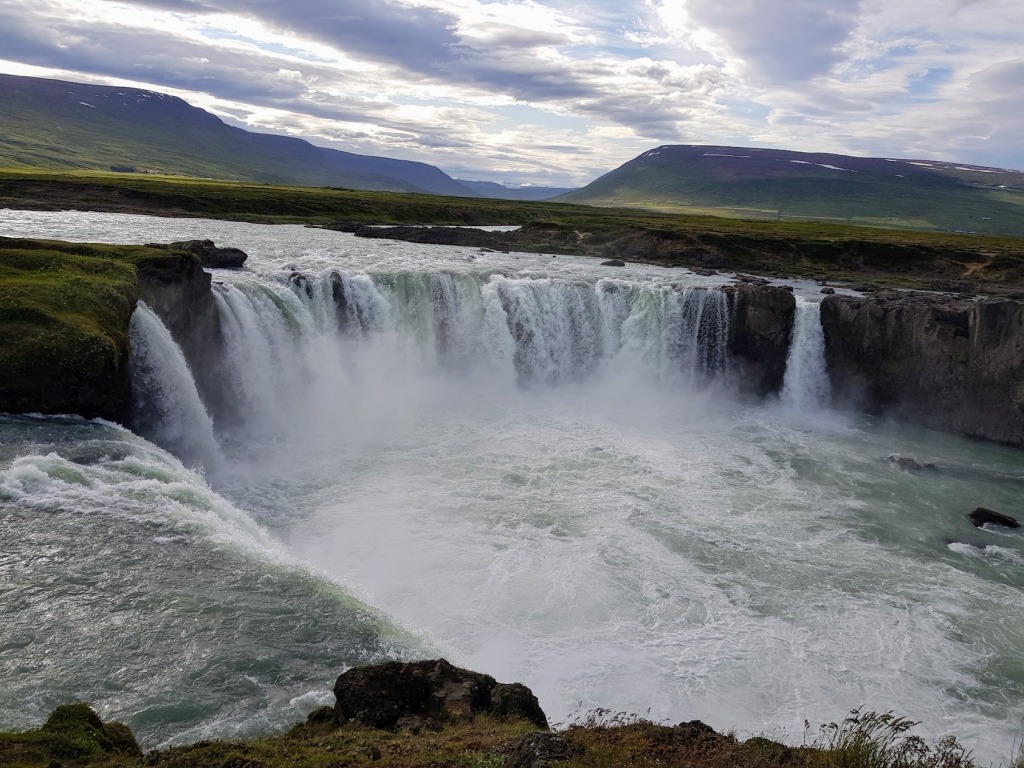
Godafoss
After exploring the lake you can continue on the ring road or take a dip in Myvatn Nature Baths; North Iceland’s answer to the Blue Lagoon. It’s less than half the price of the Blue Lagoon if you get a student discount. The water has the same silky blue colour as well as a decent steam room and a bar if you want a drink, it was good enough that we cancelled our Blue Lagoon booking to have the money to check out more thermal baths on our trip.
After Myvatn the next big stop is Godafoss; a stunning yet isolated waterfall. It’s near the ring road so definitely stop by en-route to your campsite. We stopped in Akuyeri, Iceland’s second largest city, for some supplies before setting up at Varmahlíð campsite for the night.
Day 8- Varmahlíð to Borganes
This day was a bit disappointing for us because it’s a lot of driving before you reach much worth doing. If you have an extra day then you can either use it to explore the northern peninsulas for seals and other wildlife or give yourself time to drive some of the Snæfellsnes peninsula later in the trip.
We stopped by Hvammstangi to see some of the wildlife but unless you get a boat tour you’ll find an unremarkable town, with a seal museum if you’re keen. From here we stopped by Grabuk volcano to stretch our legs before trying to reach Deildartunguhver. However, to reach the volcano you need a 4×4 and the springs have been tapped by the Krauma thermal baths so there isn’t much to see anymore as there’s construction going on.
Husafell river walk
There are some pretty waterfalls (Hraunfossar) that are formed on lava fields and can be a stunning blue when it’s not murky from a recent storm; another unlucky break for us. You can then drive into the isolated Husafell which has a visitors centre with well marked hikes to do. This was my favourite part of the day, even though we just did a small walk along the river. I’d definitely recommend giving yourself some time here and there’s a great longer hike that goes up along a canyon if you have the energy.
We decided to drive onwards and camp at Borgarnes instead of Husafell as we needed to get to a supermarket. However, if you have supplies then I’d definitely recommend staying in Husafell as Borgarnes campsite was the worst campsite I stayed at (a field with no showers or facilities aside from 4 toilets). If you do find yourself staying in Borgarnes then head to the municipal baths to redeem the town. It has several hot baths, a great steam room and a few water slides for a fraction of the price of any tourist thermal baths.
Day 9- Borganes to Reykjavik
The weather was against us in the morning but the original plan was to climb up Hafnarfjall and admire the views. Instead we drove straight on to Hvalfjordur. There’s a few things to see and do around here but the main attraction is hiking Glymur waterfall which is the second biggest waterfall in the country (the biggest easily accessible one).
GlymurWaterfall
The hike is around 7km in a loop and was my favourite of the trip. It starts off easy until you go through the cave. After this you need to cross the river using the ropes provided and the incline drastically increases with more ropes to hold onto. It’s a lot of fun doing it and the views are stunning; make sure you have good footwear though.
Once you reach the waterfall you can either turn back or complete the loop by wading through the river. It went to just below my knees and is freezing. I tried to carry Nicole across and ended up dropping her in (sorry!) because if you don’t stand on sharp rocks you stand on slippy ones. After the river it’s an easy walk back down with more good views.
On the way to Reykjavik we stopped by Mt.Etna and Esjurætur Hiking Center. There are lots of hikes here but it was late in the day so I opted for a short one. Unfortunately the clouds descended and I couldn’t see more than 10m so I was forced to stick to the woods near the start where I could at least see where to go/appreciate the nature. However, if the weather is good this is supposed to be a stunning hike.
After accepting defeat we drove on to Reykjavik campsite (free showers and indoor cooking facilities) and wandered downtown to grab some dessert- try Lookoomas for a sweet greek treat.
Day 10- Reykjavik to Fludir
Thingvellir National Park
Day 10 aka my birthday started off with a splurge for breakfast. We went to Sandholt and the food was amazing! They also had sandwiches that looked delicious if you want to take some with you. Bear in mind you can’t book and it took us about 30 minutes to get a table.
After breakfast we sped over to the Golden Circle starting with Thingvellir National Park. Here you can see where the first parliament was formed as well as see the gap between the tectonic plates (and snorkel it with a drysuit if you have £100 to spare). This place is often the first place people go to and the distance from Reykjavik means it’s really busy- you’ve been warned.
If you are doing well for time (maybe you didn’t indulge in brunch) there is a 3 hour hike to Bruarfoss before you reach your next destination. Due to it being on private land there’s no way to drive closer but it’s supposed to be one of the bluest waterfalls in Iceland (we went at the end of the day but didn’t realise it was such a long hike).
Geysir
You can then drive through the park towards Geysir. This is a similar vibe to Yellowstone and has been heavily invested into -part two of my birthday meal was a pizza at the giant complex across the road from the geothermal area.
The geyser that gave Geysir it’s name is super reliable, erupting every 20-30 minutes and you can get way closer than old faithful in Yellowstone, despite the height not being massively smaller.
After getting your fill of steam, drive on to Gullfoss. This is a really popular waterfall and it is amazing; the gentle beginning seemingly cascades into a deep ravine with a thundering crash.
The day ended as it should, with a thermal bath. We went to Secret Lagoon which was really scenic; you can see the springs directly feeding the bathing area. They have a ton of foam floats which lets you lie back and float aimlessly through the hot water- super relaxing! From here it was a short drive to Fludir campsite (no thrills but cheap).
Day 11- Fludir to Grindavik
This is the last proper day and we started off with a detour from the golden circle to Hjalparfoss. It has similar geological patterns to Svartifoss in Skaftafell but you’ll probably have the waterfall to yourself this time.
Gjáin
From here, it’s a short drive to Stöng– a viking era long house. There’s parking nearby and lots of info explaining the likely layout of the house. On the walk back to the car park you will see a path directing you to Gjáin. The walk is only around 15-20 minutes but leads you to a secluded waterfall with a scenic river and cave.
The actual car park for Gjáin is another 5 minute drive but it requires a 4×4 and you’ll see the people who drive direct on the other side of the river (I tried my best but short of precarious stones there’s no way across). If you do have a 4×4 you can continue onwards to the picturesque Haifoss too.
After this is a long drive to near Grindavik to climb the active Fagradalsfjall volcano. Check this website for safety tips and updates, we chose route C. If you park in any of the parking slots you’ll be expected to pay online. The website I linked has basic maps but once you set off you’ll see swarms of people that you can follow.
Fagradalsfjall volcano
The walk is amazing if you’ve never been to an active volcano before, even seeing the smouldering lava is impressive. Keep an eye on the crater for any lava, when the volcano is active it’s captivating to watch, and I spent 30 minutes sat there as it cascaded into the valley.
It’s quite sporadic and you might be unlucky. If you’re really keen to see it then listen out whilst you’re at Grindavik campsite (indoor cooking facilities) as the owner will announce if the volcano is active.
Day 12- Fly home
Our flight left at 9am so this day just consisted of cleaning the van and dropping it off. If you have extra time then you can relax in the Blue Lagoon or go on some hikes near Grindavik (check out routes at the campsite).
Enjoying the blog?
Congratulations for making your way through this huge itinerary! I hope it was helpful, if you enjoyed it then drop a like and subscribe for more content. See you next time!
Iceland is absolutely stunning and a big part of that beauty is due to the abundance of waterfalls. They are everywhere and the majority aren’t considered tourist attractions despite being better than some countries’ best.
This list covers 10 of the best waterfalls I saw on my trip to Iceland. They are spread all over the country and are all accessible without a 4×4 so no excuses!
1) Seljalandsfoss
Seljalandsofss
This waterfall is probably one of the first you’ll come across travelling the South coast. It’s not as tall as some of the others on the list but you’re able to walk behind the cascade, giving you a true 360 degree view of it.
It’s free to see but their is a charge for parking (some people were parking near the road a little bit further up so this might be a loophole).
If you want to get your money’s worth for the parking fee then check out the hidden waterfall nearby, Gljufrabui. I really liked the mini canyon leading to this waterfall, it feels like you’re in the middle of a rainforest.
Gljufrabui (800m away from Seljalandsfoss)
2)Skogafoss
Skogafoss ft. a faint rainbow
It’s likely that you’re going to see Skogafoss on the same day as Seljalandsfoss and it’s definitely worth it. It seems like a much more powerful waterfall and the spray meant there were rainbows all over the place.
Once you’ve checked it out from the ground you can take some stairs up the side to get an aerial view and then follow the course of the river to see some smaller falls (don’t walk indefinitely, it’s 10+ km one way).
3) Svartifoss
Svartifoss is awesome and easily accessible from Skaftafell campsite in Southeast Iceland. The hike is 2km and isn’t too challenging despite the initial ascent. The cool thing about this waterfall is the rock formation surrounding it; it’s a great example of basalt column formation.
If you want to extend the hike then you can continue to Sjonarnipa which then loops back to the visitor centre and gives a great view of a nearby glacier.
4) Hengifoss
Hengifoss
Hengifoss is the 3rd tallest waterfall in Iceland and is less visited than the first three on our list due to its location in the east of Iceland. It’s quite a lengthy uphill walk compared to the a lot of the other waterfalls but you the route is scenic and there’s a cool view of the lake on the way down.
When you get to the top look out for the plastic post (this has a guestbook to write a message and your nationality). When we did the walk up it was uncharacteristically hot but there’s an ice cream truck at the bottom that does great mango sorbet.
5) Guffufoss (and Seydisfjordur)
Guffufoss
This isn’t a well known waterfall but I stumbled across it accidentally on the way to Seydisfjordur. The whole area is stunning and filled with waterfalls that you can hike between.
Guffufoss was a hidden gem that would definitely be a highlight in any other country and staying here is a must for the walks and views.
6) Dettifoss
Dettifoss isn’t really a pretty waterfall but it’s absolutely monstrous. It’s one of the most powerful waterfalls in Europe and that’s immediately apparent when you get here.
Dettifoss
You can check it out from the top of the canyon and can walk a few kilometres to some of the other waterfalls but Dettifoss is the key attraction. There are two routes to take, they lead to opposite sides of the waterfall.
If you are travelling anti-clockwise then the first sign to Dettifoss is a long dusty road. One of the few cars we saw was a campervan with two shredded tyres (apparently the other route is better paved).
7) Godafoss
Godafoss
There’s a myth that when Iceland switched from a Nordic to Christian religion, the local leader threw a religious statue into the waterfall, thus giving Godafoss its name. Regardless of the origin, Godafoss waterfall is really cool; it’s basically made up of 5 smaller waterfalls that look like a huge panoramic waterfall from a distance.
It’s on the way out of Myvatn and is fairly isolated in terms of things to do nearby, but the nearest big city to stay in is Akuyeri which is worth checking out.
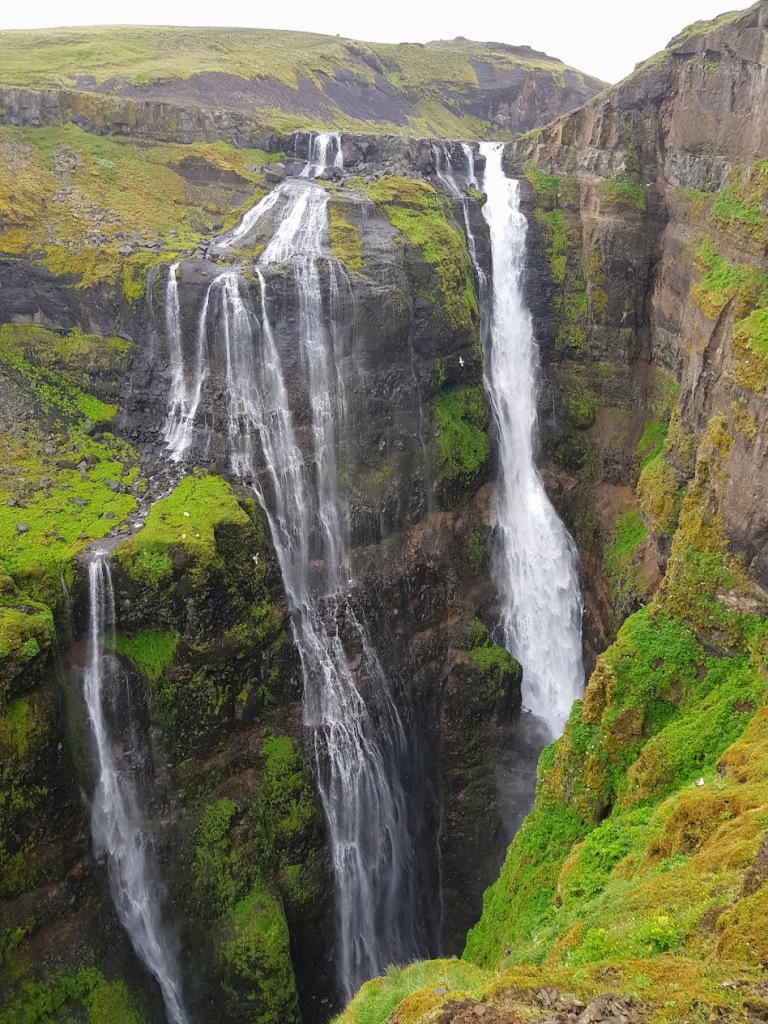
8) Glymur
Glymur
The hike to Glymur waterfall was my favourite of the trip. It goes through a cave and across a river and gets quite tricky part way through; there are ropes to get up some steep parts. The waterfall itself is cool (and either the tallest or second tallest in Iceland depending on sources) but the surrounding scenery and canyon adds to the effect.
It’s 3.5km each way but make sure to wear good hiking boots and be aware that to complete the hike you need to cross the fjord at the very top (it goes up to your knees and can be slippy in spots).
9) Hraunfossar
Hraunfossar
Hraunfossar is unique from the other waterfalls on the list because its formed from lava flows. The waterfall isn’t tall but it is really wide and on a clear day the water runs a bright blue. Unfortunately, the day we went was pretty rainy and the water was a murky brown.
It’s in the west of Iceland and can be quite a detour from the ring road for a 10 minute view of the waterfall. Consider combining it with a hike in the nearby scenic Husafell.
10) Gullfoss
Gullfoss
Gullfoss is part of the golden circle in southeast Iceland and could possibly be one of the first waterfalls you see, if you start in Reykjavik. It’s pretty busy here because it’s really touristy but the waterfall is very cool; its sort of split into a shallow part followed by a steep cascade into a canyon.
Other nearby spots of interest include the geyser centre which has a geyser that erupts ~ every 20 mins.
Enjoyingthe blog?
That’s it for this post, hopefully this inspires you to go waterfall hunting around Iceland. Let me know what your favourite waterfalls are in Iceland in the comments and don’t forget to subscribe for updates!
After a hefty year of medical school and exams I’ve hit my summer holiday and, unlike last year, I can actually travel in this one! I viewed the government’s tiny green list optimistically by using it as an excuse to visit Iceland, a country I’ve always assumed was too expensive.
Whilst Iceland is definitely up near the top in terms of costly countries, I think it’s been blown out of proportion. Some sites will suggest that your trip will cost several thousand pounds/dollars, yet I travelled Iceland for 12 days with Nicole for just over £2000 for both of us (scroll down to see a budget breakdown).
This article will give a few tips on how to stick to a budget in Iceland whilst avoiding a completely barebones holiday.
Food
1) Cook your own meals
This is a no-brainer but will save you a lot. Outside of major cities, towns don’t have an abundance of restaurants anyway and cooking can actually be more convenient. Some campsites and most hostels will have cooking facilities and a portable hob is included with camper vans.
We ate out a few times: when packed lunches were getting too much half way through the trip, for my birthday, and on the last night as a celebration. The food is about 20% more expensive than in London so eating out all the time isn’t a fantastic idea. However, if there’s something you have to try (lobster soup for us) then go for it.
2) Shop at low cost supermarkets
Just like the UK, not all of the supermarkets cost the same amount. No one is going to tell a budget traveller to stock up in Waitrose.
I find the piggy bank simultaneously gross and adorable
The cheapest supermarket is often Bonus, the majority of which are found in cities, and more so on the south/west coasts. Netto and Kronan are also good options and often have better hours (Bonus shuts between 5:30-6:30, presumably to keep costs down).
In addition to choosing the right supermarkets, aim to do big shops in the cities as, even within the same chain of shop, the costs increase the more rural the location.
3) Be creative with your meals
Not everything in Iceland is inflated in price; many items are the same price or sometimes cheaper than the UK. However, the pricey items can be stupidly expensive. For what is likely a trip of less than 2 weeks, you can surely manage without certain foods to stick to a budget.
The following foods were consistently pricey across Iceland:
Chicken (£12/kilo)
Any mainland European cheese (£6 for 8 slices)
Bell peppers
Bananas/other exotic fruits
Basically, perishable foods are expensive but meats like pork and fish were more reasonable than chicken so we switched a few meal plans. We cut cheese out of our recipes and opted for dishes with eggs which were relatively cheap.
4) Check for deals
Remember the scary 10 minutes around 6-7pm on the refrigerated aisle in Tescos? A shaking teenager comes out with a price gun and starts putting discount stickers on meat and hungry students/thrifty shoppers unleash hell.
It’s the same in Iceland. All of the discount supermarkets will have a section where meat is discounted (sometimes up to 50%) and it can slash your costs. It meant we ended up having salmon for dinner instead of pork because it was only £5 for a kilo and we switched from pork mince to beef mince on our last night.
5) Bring expensive food with you
If there are some fancy foods that you can’t live without then bring them with you. Don’t bother with dry foods like pasta or rice- the cost difference isn’t massive. We brought some Japanese curry cubes, instant porridge, and spice sachets (chicken fajita/chilli con carne) as well as some digestives. In retrospect I’d probably take some cheese as well.
Travelling
6) Hire a car
Tours are super expensive if they include travel and car hire is probably the best way to cut costs. We opted for a campervan to avoid having to rent tents/cooking equipment separately.
Consider what route you’re planning on taking before hiring the car- a lot of inland routes require 4×4 driving. Also, make sure to shop around for deals; we went with star car rentals and they were very good.
7) Use a petrol discount card
Most car rental/campervan companies will offer a discount tag with the keys. These work for Ob and Olis petrol stations and it takes 15ISK/litre off. It doesn’t seem like much but if you’re driving the ring road it will add up.
It probably isn’t worth detouring too much to go specifically to one of these stations but try to plan your route to fill up when passing by. Additionally, petrol is much cheaper in large cities so try and completely fill up when passing through Reykjavik/Akuyeri.
Accommodation
8) Stay in campsites
Hotels and guesthouses are expensive in Iceland and in summer can be completely booked up. Conversely, campsites nearly always have space and don’t need reservations, and are often very well maintained.
If you’re travelling for over 2 weeks then consider the Camping Card, this gives you access to 35 campsites across Iceland for €159 over a month for 2 adults and 2 children.
If you’re travelling solo it likely won’t be worth it for <2 weeks but for groups can be very cost effective. However, it does limit you in where you can stay, particularly in the southeast. For this reason we chose not to get it, despite the fact it would have saved us around £80 in total.
Activities
9) Explore the nature
Iceland is stunning and the best way to explore it is to hike to see the waterfalls and explore the lakes, geysers, mudpots, and mountains. It essentially costs nothing and parking only costs in the most popular spots.
Explore everything Iceland has to offer- for free!
Lots of hikes are very well marked, especially in the more touristed southern coast and visitor centres are very helpful. Whilst there will undoubtedly be some museums/indoor attractions you will want to see, be selective.
This also applies to the Blue Lagoon. We originally had booked to end at the Blue Lagoon but ended up cancelling it because we felt we had been to enough thermal baths. For less than the price of the Blue Lagoon tickets (£46) we went to Myvatn baths as well as the secret lagoon and some less popular local baths that actually had the biggest selection of thermal baths and saunas out of the lot.
10) Avoid overdoing tours
Don’t hike glaciers without a guide
Tours are expensive and often unnecessary. If your choosing a tour because you are worried about organising seeing everything then you needn’t worry; Iceland’s big sights are very well signposted and everything is pretty easy to navigate.
That said, there are a few activities that massively benefit from tour guides. For example, glacier hiking requires a guide and is a surreal experience; the same is true for kayaking on glacier lagoon.
Additionally, hikes in historical areas like Thingvellier National Park may benefit from a guide. However, being selective on tours will save lots of money and always check if there’s a discount for meeting the guide at the starting point instead of getting picked up.
Budget breakdown
From 06/07-17/07
Flights- £327
Campervan with a heater (+renting 1 sleeping bag and a cooler)- £803
Campsite fees (+ 1 night airbnb/showers/1 wash+tumble dry)- £244
Food (mostly self-cooked, ate out 4x and had a few ice creams/coffees)- £253
Activities (four thermal baths, glacier hiking tour, return bus tickets to reykjavik on day 1, entrance to see vestahorn)- £257
COVID tests (Lateral flow test in Iceland and day 2 test)- £138
Total= £2232 (£1116/person or £93/person/day)
Considering Iceland is supposed to be prohibitively expensive, this breakdown suggests it is manageable on something resembling a budget. However, I understand that the cost of flights may vary markedly for US travellers.
Enjoying the blog?
Thanks for reading this article, hopefully it will be helpful in planning your own trip. Make sure to like the post and subscribe for future articles!
The American Voyage continues on from Jackson, Mississippi towards Memphis, Tennessee. Memphis is renowned for being home to excellent musicians and cooking up some fantastic Southern food.
We stayed here for just over 2 days with a Couchsurfing host (8/10 excluding the fact he secretly filmed me in the shower; read Couchsurfing safety here). Although we managed to cover a lot of ground in those 2 days, it isn’t enough to do Memphis justice. There is so much to do here so make sure to give it a couple of days, especially if you’re a foodie or into music.
This post is going to give you 9 solid ideas, from worshipping Elvis to delving into civil rights, on what to do when stopping over in Memphis.
1) Stuff yourself with BBQ
This was all I was thinking about on the bus up from Jackson. Memphis even has a style of BBQ named after it so you know it’s good. We had BBQ on both nights and it was all excellent. I could recommend a restaurant (e.g Central BBQ) but there are so many to choose from that I’d just follow your nose.
Some dishes to try if you’re visiting from the UK would be the Memphis-style dry rub ribs, a serving of loaded nachos, as well as some cornbread (I found it crazy how they essentially serve cake as a side for BBQ).
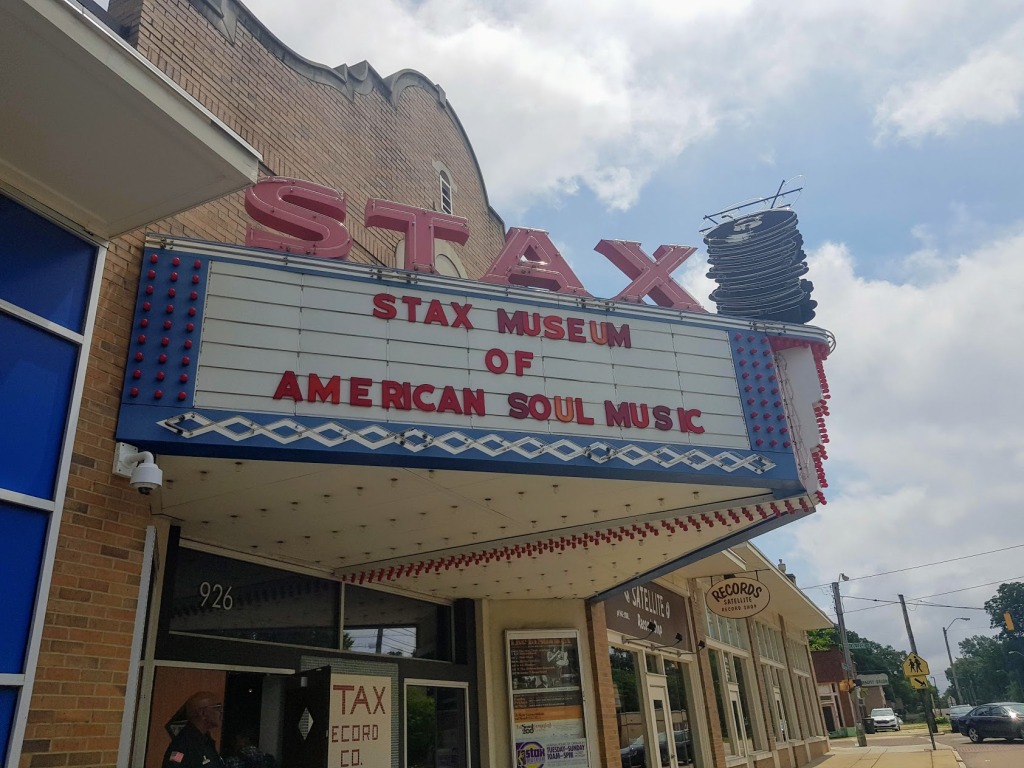
2) Check out the Stax Museum
The Stax museum is the Museum of American Soul Music and is a must see in Memphis. It goes in depth on the changes in musical style, the technology behind recording the music and gives tribute to all the artists who recorded there.
I wouldn’t list Soul Music as one of my favourite genres but it quickly grew on me and I started to hear songs that I’d never realised counted as Soul. There’s also a dance floor if you’re really into Soul music.
Entrance fee: $13 ($12 for students)
3) Explore Downtown
Wandering around downtown Memphis in the afternoon was much more pleasant that I expected it to be. The streets were clean and there was lots of cool street art dotted around too.
We didn’t follow a particular guide, we actually just walked towards the giant pyramid which turned out to be surreal. It’s mostly taken up by a Bass Pro Shops outlet but the interior is like a swamp/rainforest and there’s also a hotel in there.
If you want a good view of Memphis you can go to a viewing point at the top but we didn’t want to spend the money ($10).
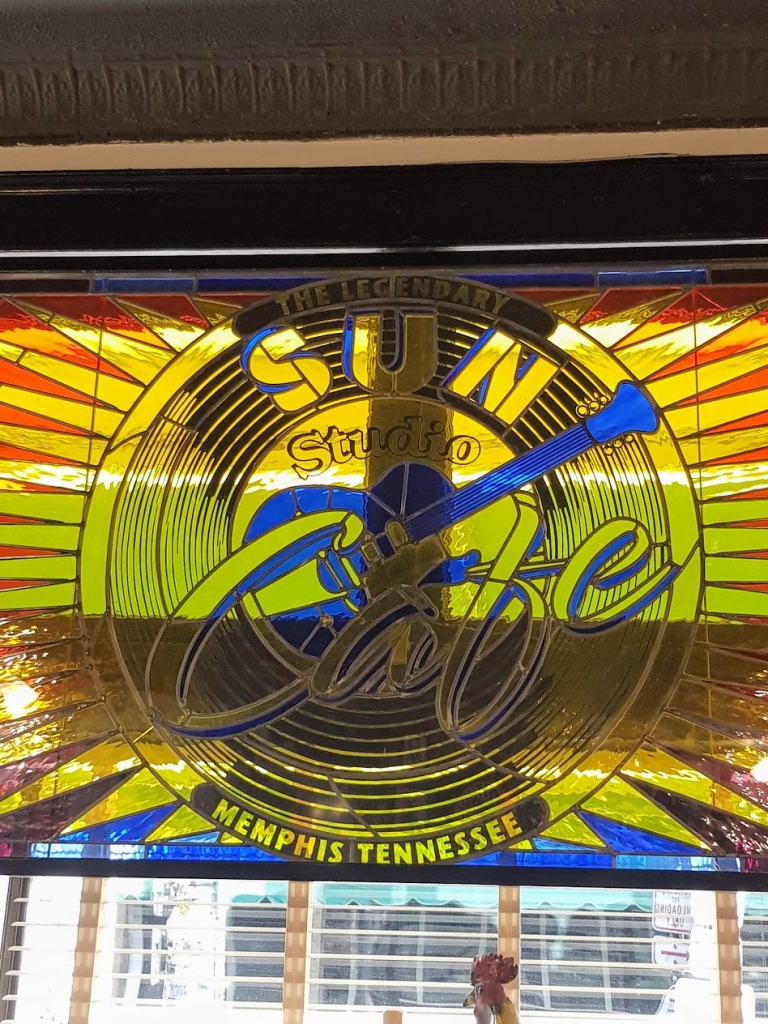
4) Visit Sun Studios
The home of Elvis Presley, Sun Studios is also an excellent option when in Memphis. I was sceptical about visiting Stax and Sun Studios in one day but they’re world’s apart.
Sun Studios is the “home of Rock’n’Roll” and as such is a completely separate music experience. Unlike Stax, Sun Studios is tour only so try and time your arrival with the start of a tour as we were waiting around for a while. If you do visit both in the same day you can actually get a shuttle between the two museums instead of walking from Downtown like we did.
The tour guides are excellent and knowledgeable, with a contagious enthusiasm for the genre. This is also where I found out that American’s can get really immersed into tours. If you step back and try to look cool you look like a boring Limey so get involved.
Entrance fee: $15
5) Watch the sunset
Not much to say around this one. We were sat around waiting for an Uber and there’s some seating along side the Mississippi river. The state is bordered by the river, and the opposite bank is Arkansas and I was tempted to count it as having visited.
It’s a peaceful end to the day if you’re stuffed full of BBQ and tired of learning about Memphis’ rich history of music.
6) Splash out at Graceland
If you’re a die-hand Elvis fan then Graceland is not one to miss. The home of Elvis Presley, is impressive, especially combined with the private jet parked across the road.
We weren’t too bothered about seeing the inside of the house as tickets were a minimum of $47 (going up to $190 for a VIP tour). It’s very commercialised and I think would be underwhelming for the price if you weren’t actively interested in ELvis.
We arrived early morning and wandered around the grounds, saw the outside of the house and the garden, as well as the planes. This only took us 15 minutes but after getting a musical Elvis education at Sun Studios, we didn’t want to splash out for more information of Elvis’ home life
Entrance fee: minimum $47
7) Learn at the National Civil Rights Museum
This is a must see in Memphis, it is so impressive. We had already been to an excellent civil rights museum in Jackson so we were already had a good background. This museum gives thorough coverage of the civil right movement up to present day with some very well designed dioramas. It’s mostly located at the Lorraine motel where Martin Luther King was assassinated and the room has been preserved as such.
An interesting extra exhibit covers possibilities of motives and assassins and is located across the street. There’s a lot to take in, even without this part, so give yourself plenty of time for this!
Entrance fee: $17 ($15 for students)
8) Go on a night out in Beale Street
Beale street is the place to head to for your nights out.
It’s packed full of bars all with great live music playing and there’s something for everyone so shop around and find your spot. We were there for Yash’s 21st birthday and went on a small pub crawl that fizzled out due to eating too much delicious BBQ.
It’s visibly policed at night so it feels safe to walk around and I’d also recommend wandering down it in the day, there’s often a lot of street performers.
9) Explore Shelby Farms Park
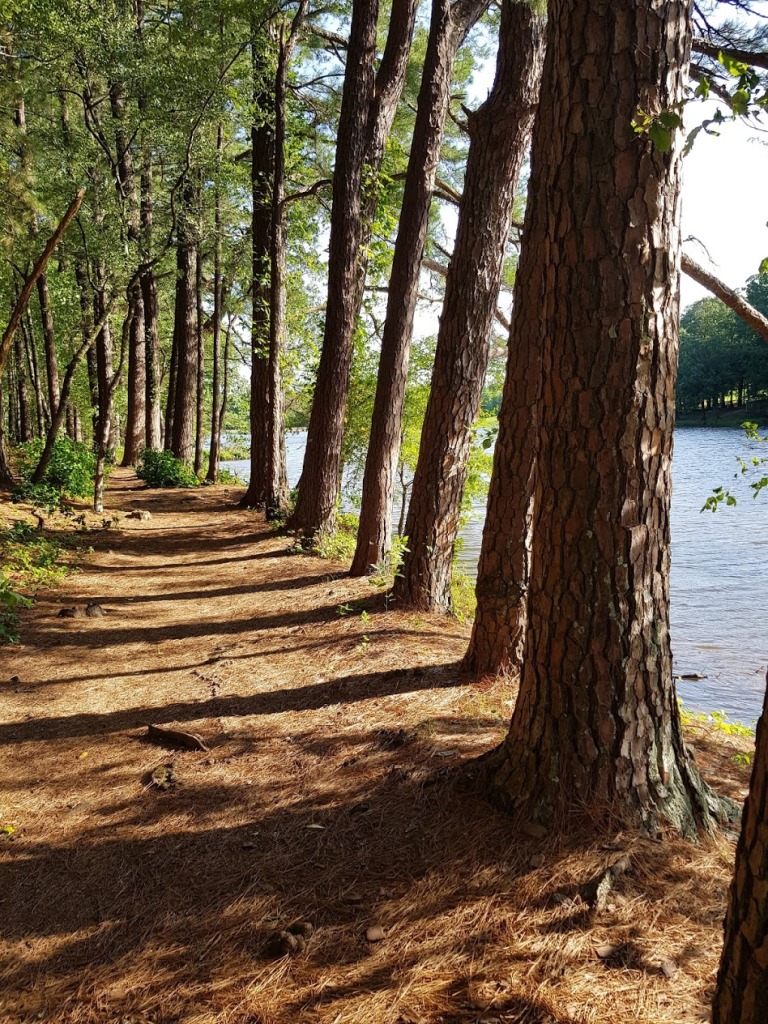
I always enjoy getting a bit of nature wherever I am and, in Memphis, that spot is Shelby Farms park. It’s five times the size of Central Park but is easily reachable from downtown (we got an uber).
There’s so much to do here but we just explored it on foot due to poor planning. If you want to try something different then try hiring bikes, renting a kayak, or even doing a GoApe zipline course. Bring a picnic and it’s a great day out.
Enjoying the Blog?
That’s all for now; seeing these 9 places gives you a solid base on what Memphis is all about. Of course there’s more but that’s up to you to find for yourself. Let me know in the comments where else you’ve been and what you’d recommend. Coming up: Nashville, Tennessee!
After a brief hiatus to discuss the rules surrounding green-list travel from the UK, the American Voyage is back.
The starting point for the trip was New Orleans in Louisiana and we decided to stop over for a day in Jackson before continuing on towards Memphis. This post will give you an idea of what to do if you find yourself in Jackson for a day or two.
Why go to Jackson?
Mississippi is a state filled with history, having been a central region involved in the slave trade. Whilst Jackson ended up ranking pretty low on the list of places I went to in the South, I found it quite surreal as a city (e.g our Uber was driven by a local priest who blessed Yash in an attempt to save his soul from non-christian deities).
Outside the city hospital
The city seems to be stuck several decades in the past and is still very traditional. The architecture doesn’t match up with other state capitals and de facto racial segregation is immediately obvious, however it seemingly stems from social disparity at present. This is evident on public transport (we were the only white people on the local bus) and in restaurants (the more expensive restaurants were almost exclusively white).
Whilst this might not warrant diverting your itinerary to come by Jackson, it should pique your interest if you find yourself looking for a day to break up the journey.
What to do in Jackson?
I haven’t painted the best picture of Jackson but, don’t despair, there is plenty to do to occupy yourself for several days (even without a car).
Mississippi Civil Rights Museum
As I mentioned, Mississippi was heavily involved in slavery and then resisted civil rights movements throughout the 20th century. The museum is a candid account of everything that happened leading up to and involving the slave trade and subsequent events.
Looking up at The Little Light of Mine display
It details Mississippi’s involvement as well as providing coverage of national events and does so without bias. If there is one thing you do in Jackson, it should be going to this museum. It is reasonably priced ($15 for adults of free on Sundays) and can take half a day if you wish to explore it in depth.
The centrepiece is the “This Little Light of Mine” sculpture that glows brighter as more people enter the central gallery. Ultimately, the museum gives a hopeful message for the future to offset the turmoil you will have felt after reading horrible stories at the beginning.
LeFleur’s Bluff State Park
This was an impromptu visit due to a delay in our bus to Memphis so we had several hours to spare. If you don’t have a car then it’s not extortionate to get an Uber but choose the natural science museum (free) as your destination otherwise you’ll have a confused driver wondering where exactly in the park to drop you off.
The park is pleasant to walk around, and offers the possibility of camping if you’re on a tight budget. We had our backpacks so limited the walking as it was midday in June but bring some food and it would be a good spot for a day out and a picnic.
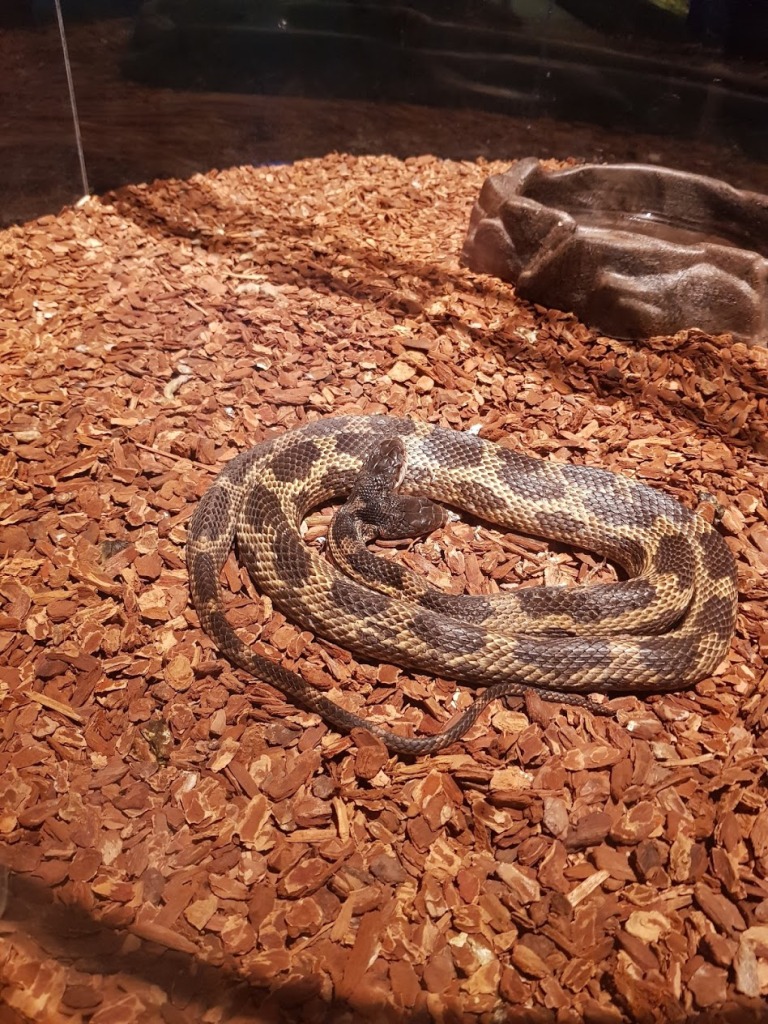
Mississippi Museum of Natural Science
A two-headed snake!
An accidental find after wandering aimlessly into the LeFleur’s Bluff State park, we ended up stumbling across the science museum. Another welcome source of air-con, it’s reasonably small (I think the Natural History museum in London spoilt me) but a good adjunct if you find yourself exploring the park.
It also semi-functions as a small zoo and has some reptiles and amphibians, with some added information on their habitats. If nothing else, it’s a physical destination to order your returning Uber to pick you up at.
Mississippi Museum of Art
Making silhouettes
We ended up here because it was the first thing to open on the Sunday and one of the exhibition areas is free. The museum is located fairly centrally and has a good mix of modern and traditional art.
The modern art section also has some interactive exhibitions; when we were there we had the opportunity to create silhouette drawings of each other. If you aren’t massively interested in art this won’t take more than 2 hours but it’s a nice air-conditioned break from the Mississippi humidity and heat.
Explore the city
As with any city, sometimes the most enlightening thing to do in a new location is get lost in it. Exploring Jackson on a Sunday morning is like being in a post-apocalyptic world and we experienced the full force of the Bible Belt. We were the only people on the streets and walked in the middle of the main road cutting through Jackson; the only cars were crammed into the countless church car parks dotted across the city.
Don’t be restricted by feeling you have to “do something” in a city; walk around and discover hidden spots and quirks that define a city. If you really want a crammed schedule then you can wander to monuments like city hall and the state capitol, but I’d generally avoid Sundays; the chances of getting a bus or taxi before midday are slim/non-existent.
Where to eat in Jackson
Mississippi is America’s fattest state and the people who mentioned it varied in their pride upon disclosure. It’s gained the title through a combination of high-priced nutritious food combined with cheaper fast food and plenty of delicious BBQ.
Smores cake
We were recommended two restaurants to try out and they were both excellent. The first was The Pig and Pint which serves a variety of BBQ meats for a reasonable price with classic sides. It’s outdoor covered seating and you order at the counter and get it brought out to you. A reasonable choice for cheap travel.
The second restaurant was called Saltine. It was a bit fancier serving Southern-style seafood (I had seafood linguine and Yash had battered catfish and chips). The food was pricer, but still reasonable, with full table service and the meals were delicious. They also had fantastic desserts; try the Smores cake.
How long to spend in Jackson
In honesty, I think a day and a half/one night is enough time to get a taste of Jackson. If you have no schedule then spend 3-4 days and find some hidden spots and restaurants, maybe camp in the State Park. However, if you have a time limit, I think there are more impressive cities to save your time for.
Enjoying the blog?
This post should give you more than enough inspiration to cover a full day and maybe another half day if you have a late layover. Let me know what you thought of Jackson and what you got up to in the comments below!
If you’re new then join the mailing list to get each post sent to your inbox every 2 weeks!